WD MyCloud Home安装运行Debian 11 #
如果您拥有 Western Digital My Cloud Home,您可能已经注意到产品支持生命周期结束(2023 年年中),您来到这里是因为您想要替代方案并继续安全地使用它。
完全控制您的设备怎么样?以下是一些原因/用户案例:
- 它不再接收固件更新或安全补丁,使您的设备容易受到潜在安全风险的影响。您是否了解过与此产品相关的已知漏洞的数量和严重性?
- 它的硬盘驱动器已经死机,需要将新映像写入新驱动器,然后才能使用新的 HDD 或 SSD 重新打开它。
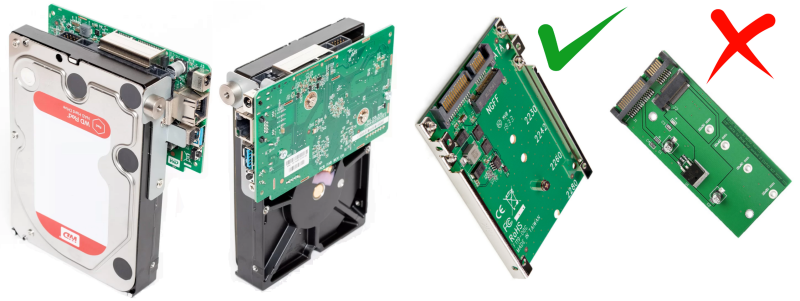
- 注意:它可能需要适配器,因为 3.5 HDD 安装孔用于将 PCB 固定在机箱上:

- 注意:我从未找到任何人成功更换过驱动器的信息。如果您能正常工作,请联系我们。
- 注意:它可能需要适配器,因为 3.5 HDD 安装孔用于将 PCB 固定在机箱上:
- 或者作为一种完全控制您的设备并使用 Debian 保护它免受此类风险的方法。WD 永远不会支持许多基本功能,例如:
- 通过 USB 3 使用辅助网络适配器或额外的存储容量
- 用于运行或计划任务的 SSH 访问
- 安装几乎任何应用程序(托管网站、Active Directory、共享打印机等)
因此,如果您正在寻找一种方法来确保您的设备安全和最新,请使用全新安装的 Debian 11(构建于 2023 年 3 月),请继续操作。
安装程序 #
预准备动作
- 将 NAS 中的数据备份到其他位置
- 下载镜像文件并解压
- 将大于8G的U盘格式化为FAT32(MBR)
- 将解压缩后的映像的内容复制到U盘
操作过程
- 关闭NAS
- 插入U盘
- 按住USB口正上方的Reset按钮
- Keep pressing the button while powering it on and keep pressed until the light is ON (about 30 seconds),
- 开机时按住按钮,一直按住直到灯亮(约 30 秒)
- 移除U盘
首次访问 #
ssh root@IP
新设备的IP可以通过路由器后台查找到。
默认密码是password,登录后请自行修改。
建议自建立账号并设置相应权限,建议禁止root直接登录ssh,并且使用ssh秘钥文件登录。
更新系统
sudo apt update
sudo apt upgrade -y
sudo apt --purge autoremove -y
sudo apt autoclean -y
sudo apt dist-upgrade -y
sudo apt --purge autoremove -y
sudo apt autoclean -y
了解新系统 #
单盘2T版本信息如下:
- 存储容量: WD RED 3.5 HDD 2TB (可用 < 1.8 TB)
- 处理器: ARM Cortex-A53 Quad-Core 1.4 GHz 64-Bit
- 内存: 1GB DDR3 (可用 730 MB)
- 网络接口: Gigabit Ethernet
- USB口: One USB 3.0 Type-A port on the back.
- 电源: ~7W (18W max) in use = About 60 kWh/year.
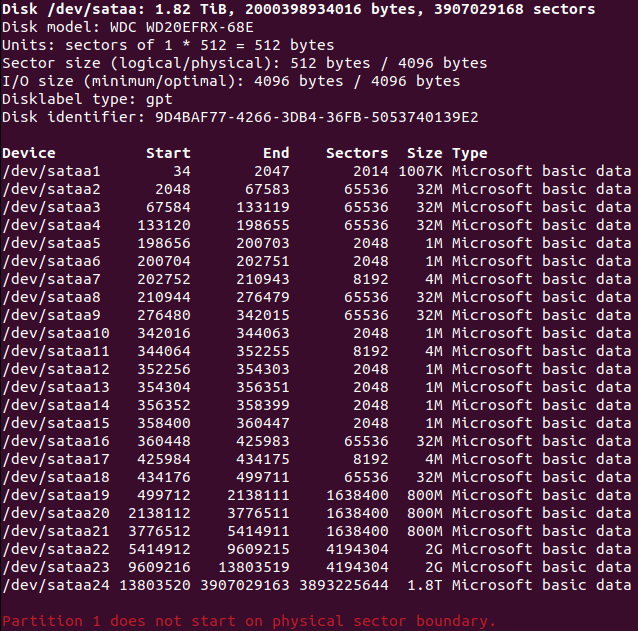
硬盘上24个分区信息(GPT):

- sataa1 to sataa19 and sataa23 – 系统未使用
- sataa20 – 775 MB (12% used) – 文件系统的根目录 /
- sataa21 – 775 MB (67% used) – 挂载点 /var
- sataa22 – 2 GB (73% used) – 挂载点 /usr
- sataa24 – 1.8 TB – 挂载的存储空间 /srv/dev-sataa24/.
注意:不建议使用 1 到 23 的分区,因为这可能会弄乱恢复过程。
U盘上的文件结构如下:
rescue.root.sata.cpio.gz_pad.img
rescue.sata.dtb
sata.uImage
bluecore.audio
omv/20-root.tar.gz ends up being copied to sataa20
omv/21-var.tar.gz ends up being copied to sataa21
omv/22-usr.tar.gz ends up being copied to sataa22
omv/bootConfig
omv/fwtable.bin
omv/rootfs.bin
新系统安装后利用率
- ~ 20% of RAM 利用率 (~140 MB / 730 MB),
- < 5% of CPU 空闲态利用率。
它是如何构建的 #
感谢 CyberTalk,他们最初发布了一个镜像,该镜像用预装了 OMV 4 的 Debian 9 覆盖了 WD 操作系统。
一些存在的问题 #
- OMV (Open Media Vault)第四版(Arrakis)发布于2018年,将在2020年结束支持。
- 当前部分repo已经不可用了。
- Debian 9 (Stretch)发布于2017年,将在2020年结束支持。
- 没有足够的空间来运行 apt update。
- Some use cases will NOT need or want this piece of software installed.
- All the moving pieces related to OMV needed to be stripped from the system before the upgrade.
- Keep it on the bare bones (lightweight) so anyone can install only the necessary applications.
- In the event of a hard drive failure, one can have a full image with all the partition schema ready to write to a new drive and fire it up.
- I don’t know if the partition schema must be preserved (cloned) to the new drive so the firmware is capable of properly boot Link.
Thanks again to the CyberTalk folks who made the base image, I only cleaned and updated it.
BONUS #
- 如果不需要,请禁用 IPv6
- 修改
/etc/fstab将大分区挂载到所需位置,而不是默认的/srv/dev-sataa24 - 不要尝试安装UFW,请使用 iptables 创建防火墙规则。
- NFS在Debian 9上不可用
- 或者,对于无法加载的 NFS 服务器,NFS Ganesha 将工作:
sudo apt install nfs-ganesha nfs-ganesha-vfs -y
sudo nano /etc/ganesha/ganesha.conf
EXPORT {
  Export_Id = 1;
  Path = /PATH_TO_SHARE;
  Pseudo = /SHARE_NAME;
  Access_Type = RW;
  Squash = No_Root_Squash;
  FSAL {
    Name = VFS;
  }
  clients = 192.168.1.0/24;
}
sudo systemctl restart nfs-ganesha
sudo systemctl status nfs-ganesha
- 对于本地网络文件共享,samba 已经是开箱即用的。
- 要在 Internet 上实现强大而安全的文件共享和存储,我建议使用 MinIO, an enterprise-grade AWS S3 compatible server Link.